

This post will help you set up your flyer for professional printing. There are a number of considerations to make before sending a file for printing.
Whether you are a beginner creating your very first flyer or learning professional print setup, this guide fully covers each step you need to follow in a simple and beginner-friendly way.
You will learn how to add bleed, prepare your artwork correctly, avoid common printing mistakes, and export a print-ready file with confidence.
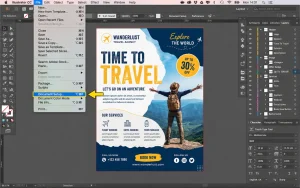
Before explaining what bleed is and why it is important, you must make sure your document is in the right color mode. All documents intended for printing must be in CMYK color mode.
To check this go to: File > Document Color Mode > CMYK. RGB color mode is used when creating designs for screens or web.
How to Add Bleed in Illustrator
Go to: File > Document Setup or shortcut Alt + Ctrl + P. A dialogue box will appear. Under Bleed and Slug, enter the bleed amount you need.
For example: 3 mm bleed is perfect for business cards and flyers while Larger projects like hard case book covers may require larger bleed areas. Click OK.
You will notice a red border added outside the artboard size. This is the bleed area. If you cannot see the red border, go to:View > Show Guides
After introducing bleed to the document, extend any background color or image to the red bleed line. When saving the document, make sure to include bleed and crop marks in the final output.
Steps: How to Add Bleed to Any Document
Step 1: Open or create a document by going to Ctrl + N. If the artboard already exists, go to File > Document Setup. A pop-up menu will appear.
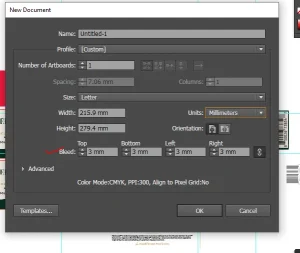
Step 2: Set a custom bleed size, usually 3 mm. You can change units from pixels to mm or inches depending on your preference.
Step 3: If you enter a value on one side and click the chain icon, Illustrator automatically applies the same bleed value to all sides.
What Bleed Is and Why It Matters
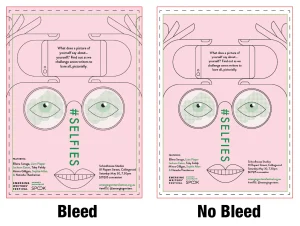
Bleed area refers to any design beyond your trim edge on a printed page. Extending your artwork beyond the actual cut area makes sure that no unprinted edges appear after cutting.
This post will help you understand how to add bleed and what it is in Illustrator and printing. Bleed and crop marks can sound like graphic design jargon, but these concepts are easier than you may think.
For regular stationery printing, we recommend: 3 mm bleed
This is ideal for: business cards, booklets, flyers. If you are creating a hardcover notebook or desk calendar, we recommend a 20 mm bleed area.
The crop marks are guides embedded into the PDF and printed document to guide the person cutting the final print. They are represented by small lines on the outer edges of the printed paper. Unless the edges are white, always leave a bleed area.
Print Design Export Settings in Adobe Illustrator
Safe Margins: Keep important text and logos at least 5–10 mm inside the edge of the design. This prevents trimming important content during cutting.
Image Resolution (300 DPI): Use images with a minimum resolution of 300 DPI. Low-resolution images may appear blurry or pixelated when printed.
Exporting Print-Ready PDF Files: Go to File → Save As → Adobe PDF. Choose High Quality Print or Press Quality. Enable bleed settings and save as PDF. Printer Marks and Bleed Settings
PDF Export Settings for Printing
When exporting:
- Go to Marks and Bleeds
- Check Crop Marks and use Document Bleed Settings
Common Printing Mistakes to Avoid
- Using RGB instead of CMYK
- Low-resolution images below 300 DPI
- Forgetting bleed settings
- Placing text too close to edges
- Exporting in low-quality formats
- Missing linked images or fonts
Recommended Print Settings
For the best print quality, use CMYK color mode with a 300 DPI resolution and save your file in PDF format. Make sure to include a 3 mm bleed and keep crop marks enabled to ensure accurate trimming during printing.
Frequently Asked Questions
Do you need bleed on all designs?
No. Bleed is only needed when artwork or background colors extend to the edge of the page. It is not needed for digital-only artwork.
What Are Crop Marks?
Crop marks are small lines placed at the corners of the document to guide printers where to trim the final design.